|
The following are the steps needed to integrate Carriers for shipping:
|
|
1. Account Setup with Carrier
Select the carrier for step-by-step instructions
1.1. Carrier website setups
1.2. FedEx Shipping Manager Server (FSMS)
Note: We recommend installing the latest (newest) version of FSMS for ALL new installations as this will minimize the need to upgrade at a future time.
- Contact a Fedex representative and request the Fedex Ship Manager Server
- Note: this is NOT the Fedex Ship Manager Workstation software
- The FSMS may be installed on the SYSPRO application server or any other server accessible from the SYSPRO application server
- After the FSMS is installed, run the meter registration procedure to register your Fedex account; note the meter number assigned
- Fedex support will generally assist with the installation-- ask them to verify that Fedex Ground is enabled, as the default is "not enabled"
|
|
2. Install Cadacus Shipping Library Setup
Go here to download the Cadacus Shipping Library Setup installation program.
Note: required for web API-based carrier interfaces.
|
|
3. Import Presets from Cross-Reference in SYSPRO
The following carrier presets are built-in, but must be imported to activate.
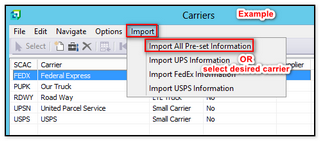
Here is an example of the "Carriers" import menu which is similar to the other imports listed in this section.
3.1. Address Verification
FedEx:
- Select "EDI Menu--> Cross-Reference Maintenance--> Address Verification"
- Select "Import" and then "Import All Pre-Set Information"
UPS and USPS:
- Select "EDI Menu--> Cross-Reference Maintenance--> Address Information Verification"
- Select "Import" and then "Import All Pre-Set Information"
3.2. Import Carriers
- Select "EDI Menu--> Cross-Reference Maintenance--> Carriers"
- Select the "Import" menu, then either "Import UPS (or FedEx or USPS) Information" or "Import All Pre-Set Information"
3.3. Import Service Information
- Select "EDI Menu--> Cross-Reference Maintenance--> Carrier Service Information"
- Select the "Import" menu, then either "Import UPS (or FedEx or USPS) Information" or "Import All Pre-Set Information"
NOTE: Do not change or add services to the list. If a service is missing, contact technical support for an update.
|
|
4. Add Carrier Accounts in SYSPRO
- Select: "EDI Menu-->Cross-Reference Maintenance-->Carrier Account Information".
- Click the ADD button on the toolbar.
An example of the "Add" Carrier Account Information window is shown below:
SCAC Code:
- FedEx: enter "FEDX"
- UPS: enter "UPSN"
- USPS: enter "USPS"
Account Code:
- For the account code, enter a user-defined "short" identifier for the account ("GENERAL", "WAREHSE1", etc.)
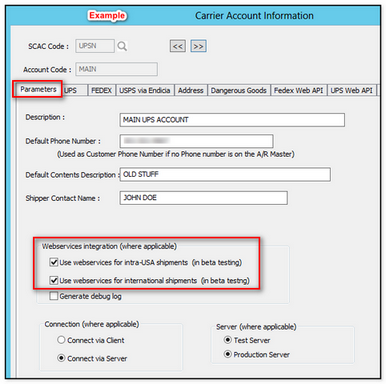
Parameters tab:
- Enter a user-defined "long" description
- Enter a phone number that will be used in case there is no phone number on the A/R account
- For all carriers, select the checkbox to use webservices for intra-USA shipments and/or international shipments
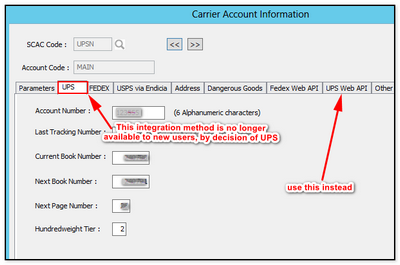
UPS tab:
-
- This integration method is no longer available to new users, by decision of UPS
- Use "UPS Web API" tab instead.
FedEx tab:
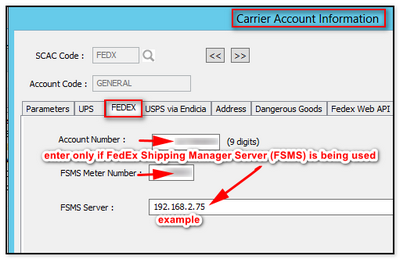
Enter this information on the FedEx tab only if using the FSMS Server.
-
- Enter Account Number and Meter Number obtained from the "Account Setup with Carrier" step at the beginning of this tutorial
- Enter the IP address of the server where the FSMS Server software has been installed, for example, 192.168.1.100
USPS tab:
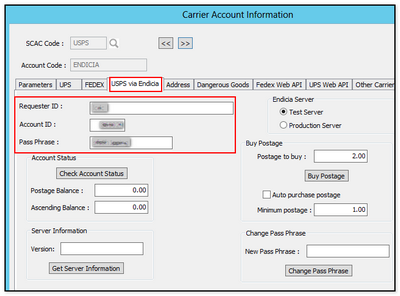
If using USPS via Endicia, for "Requester ID", enter "lcdc" (without the quotes), then enter required fields highlighted above (obtained from the "Account Setup with Carrier" step at the beginning of this tutorial)
FedEx Web API tab example:
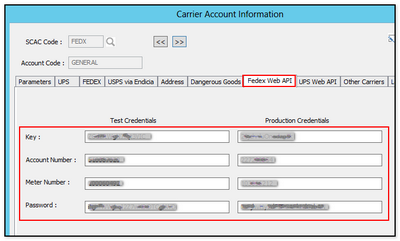
-
- If using the FedEx Web API, enter the highlighted fields above obtained from the "Account Setup with Carrier" step at the beginning of this tutorial
UPS Web API tab example:
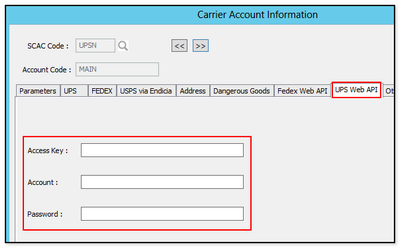
-
- If using the UPS Web API, enter the highlighted fields above obtained from the "Account Setup with Carrier" step at the beginning of this tutorial
|
|
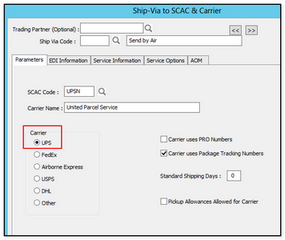
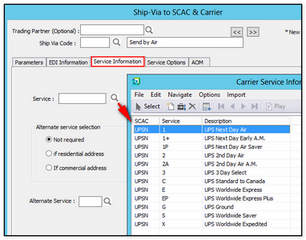
5. Connect the SYSPRO Ship-Via's and SCAC to carrier services
It is recommended that coded Ship-Via's be used within SYSPRO.
To set up in Cadacus SFS:
- Go to "EDIMNU--> Support Systems--> Cross-Reference Maintenance--> Ship Via to SCAC and Carrier Information".
- Leave the "Trading Partner" field blank and enter a Ship Via Code.
- Select "UPS" from the carrier list (the Name and SCAC will be filled in automatically).
- Go to the "Service Information" tab and select the service to match the Ship Via.
- Set any of the other parameters as necessary.
- On the "Service Options" tab, do not enter an account code
- See below setup example (this example uses UPS):
|
|
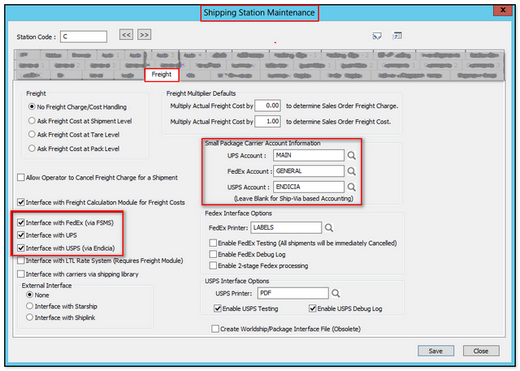
6. Enable carrier integration in the shipping station
- For each shipping station handling carriers, go to "EDIMNU--> Shipping Station Maintenance--> Freight tab"
- Activate the appropriate interface
- Enter the "Small Package Carrier Account Information" from
|
|
7. Install Cadacus Support System for Scales and Printers
Go here to download the Cadacus Support System installation program to the local workstation and run the installation to enable access to the necessary DLL's and for accessing scales and printers.
Note: The Shipping system bypasses the Windows printer drivers. Therefore the printer can be setup using the Windows "Generic Text-Only" printer drivers. Drivers for Eltron printers are available from the following sources.
Seagull Scientific Eltron Printer Drivers
|
|
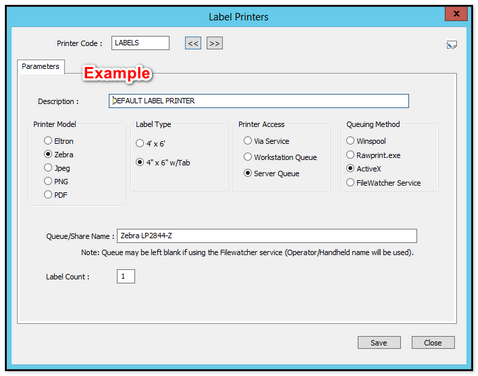
8. Add printers
- Go to: "EDIMNU--> Cross-Reference Maintenance--> Label Printers"
- Click the "add" icon
- For each label printer, enter a "Printer Code" and select the corresponding options
- See the example below:
|
|
Set up labels (UPS)
- Define a directory on the server for the storage of labels. Enter the path (including final "\") to this directory on the labels tab of the Shipping System Setup
- Download the UPS label control files (here) and unzip the enclosed label files into the label directory on the server
- Select "Shipping Label Cross-Reference" from the Cross-Reference Menu on the EDI Menu. Add two records
- the first is a "Tracking Label" with the address code of UPSN and the label file is "ups.lbl"
- the second is a "Carrier End of Day" with the address code of UPSN and the label file is "upseod.lbl"
- The label control files default to a Zebra printer using the Zebra Control Language (ZPL)
- If the printers use Eltron Control Language (EPL) change the following line "[VAR] PRINTER ZEBRA" to "[VAR] PRINTER ELTRON" in both ups.lbl and upseod.lbl
- The ship-from address must be changed on the UPS end of day label. Edit the file upseod.lbl using a text editor and correct the name and address lines indicated with the proper information. If there are multiple UPS accounts with different addresses, use the tutorial at Label Control File Setup Information to provide the proper information. One method is to duplicate the lines and then enclose them in a separate [IF] statement for each UPS account:
[IF] <ACCOUNT> = "123456"
[VAR] NAME "OUR COMPANY NAME"
[VAR] ADDRESS1 "150 INDUSTRIAL WAY"
[VAR] ADDRESS2 "OUR CITY CA 94510"
[ENDIF]
- The printer must be setup on the workstation as a windows printer. Either the actual print drivers or the windows "Generic Text Printer" driver can be used. It is best if all the workstations with label printers have the same printer name even if the printers are slightly different. As long as they all use the same control language (ZPL or EPL) they are functionally equivalent. One technique is to setup a second windows printer on each workstation using the same port information for the printer but a generic name such as "Labels". Once the Windows name of the printer has been established, use a text editor to edit the two label control files "ups.lbl" and "upseod.lbl". Change the name after "[QUEUE]" command to the name of the workstation label printer.
|
|
USPS via Endicia: Purchasing Postage
There are three methods of purchasing posting in USPS via Endicia:
- Online - Go to Endicia.com, login to your account and use the website to purchase postage
- Carrier Account Setup - Select the proper account, go to the USPS tab, enter the postage desired and click on "Buy Postage"
- Automatic - In the carrier account setup, enter the postage to buy, a minimum postage level, and enable the auto-purchase option. The solution will automatically purchase postage whenever it goes below the minimum.
|