The following is only for Windows and Windows Mobile/CE devices at this time.
The link/icon for starting the Handheld WMS Solution on the device can be setup to enable multiple configurations to exist. These configurations can be for different companies and/or different setup configurations.
The standard Windows installation stores the configuration files in c:\data\Handhelds. On a Windows Mobile/CE device the configuration files are stored in \Data. By indicating a different folder for these files, multiple configurations can be setup on the same device. There can be an infinite number of configurations on a device.
On a Windows device, create new shortcut to C:\Program Files (x86)\Cadacus\HHOnWindows.exe and entering a name for the shortcut. After the shortcut is created, right click and go into the properties and add the required parameters from the list below to the end of the "Target" information.
For Windows Mobile/CE devices, a new shortcut requires creating a link file on a Windows device and then transfering the file to the handheld. The instructions for creating the file are below.
Command line options:
- /Data= Sets the location for the configuration files
- /Temp= Sets the locations for any temp files required. This does not normally need to be changed
- /Title= Sets the title displayed in the titlebar of the main screen. (See notes below)
- /Header= Sets the header message displayed on the main screen. (See notes below)
- /Device= Sets the device name to be used for configuration settings. Note: The base device name is used for licensing. This device name is only used in the configuration settings.
Do not use any spaces in any of the options. For the Title and Header options any underscore ("_") will be replaced with a space.
The slash "/" is optional.
The Title and Header options can use tokens in the format. The available tokens are below
- <COMPANY> - Replaced with the SYSPRO company code
- <COMPANYNAME>- Replaced with the SYSPRO company code
- <EMPLOYEE> - Replaced with the employee code
- <TIME> - Replaced with the current time
System environment variables may be used in the paths. To use, surround the variable with percent characters ('%'). For example : /Data=c:\Data\Handhelds\%USERNAME%\
Example of two icons. The standard icon is setup for SYSPRO company "LIVE" and the second icon for company "TEST".
Standard icon is run and the web service setup set to go to company "LIVE". No other changes are needed.
A second icon is setup and /Data=C:\Data\Handhelds\Test is added to the command line. For convenience, /Title="Test_Company" can also be added. When this icon is first run, it will act the same as if it has never been setup, enter the web services information to connect to the test company.
Example of two icons. The standard icon is configured for warehouse user and the second icon for a job user.
This examples assumes there are two groups in the Handheld WMS configuration. One called "WAREHOUSE" for warehouse users and another called "JOB" for job users.
Standard icon is run and the web service setup. Perform a "Services, Update Settings" on the device to register the device in the configuration. Use the Handheld WMS Configuration to add the device to the "WAREHOUSE" group.
A second icon is setup and /Data=C:\Data\Handhelds\Job is added to the command line. The device name is changed by adding /Device=%COMPUTERNAME%-JOB. This will use the regular computer name with "-JOB" added to the end as the device name for configurations. For convenience, /Title="Jobs" is also added. Perform a "Services, Update Settings" on the device to register the device in the configuration. Use the Handheld WMS Configuration to add the device to the "JOB" group.
Creating Windows Mobile/CE Shortcuts
1. Create a custom shortcut on a Windows machine.
Open Notepad on a Handheld-dockable Windows machine and create a new file containing the following:
48#"\Program Files\CadacusSFS\HandheldSolution.exe"
In the above example, the number "48" represents the number of characters following the pound sign (#), and the count includes the double-quotes.
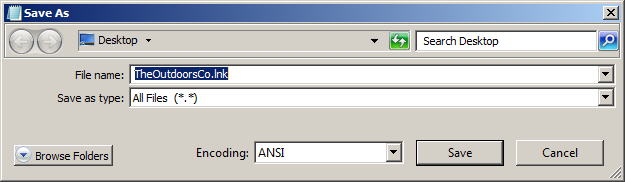
In Notepad, select "File--> Save As" and enter whatever customized shortcut name is desired. The "Save as type:" should be "All Files (*.*)" and the file extension "lnk" should be added to the file name-- in the example below, TheOutdoorsCo.lnk:
Note: If further editing of the shortcut file is needed, open Notepad, then drag and drop the lnk file into it for editing.
Dock the handheld device to the Windows machine and copy the .lnk file created above to some folder on the handheld.
On the handheld, use File Explorer to copy the link file from wherever it was placed above to, for Windows Mobile, "\Windows\Start Menu\Programs". The shortcut should now appear in the Start menu. Note: The Start menu path may be different for a different version of handheld operating system, such as CE.
Adding command line options to the Windows Mobile/CE links
For customizing shortcuts for each company and/or the Handheld Solution titlebar, follow the same steps as above and appending the desired options to the command line. The number at the beginning of the .lnk file must be updated to be the count of all characters, including quotes and spaces, following the pound (#) sign. The following example adds a /Data option. The "dummy" parameter is added to avoid end-of-line issues.
76#"\Program Files\CadacusSFS\HandheldSolution.exe data=\Data\Test dummy=dummy"